Mast Rake
Mast rake is very critical for getting the best all around performance from your J/80. Because of the differences in the measurement from the black band to the mainsail halyard sheave box, combined with slight variances in the total length of masts, we have determined that mast rake should be measured from the bottom of the black band at the top of the spar to the closest point at the middle of the stern.
1. Hoist someone to the top of the mast on the main halyard. Have them hold the end of the tape measure at the bottom of the black band.
2. Measure to the center of the stern, wrapping the tape measure around the outside of the stern directly under the tiller.
3. Where the tape measure first hits fiberglass on the top outside edge of the stern cutout, the measurement should be 37′ 4 ½ “.
4) Adjust your headstay accordingly to get this measurement.
Mast Butt Position/Prebend
Once your headstay is set for the correct mast rake, it is time to adjust the mast butt position in order to get 2 ¼” of prebend, which best suits your Ullman mainsail for a wider range of conditions.
1. Make sure your mast is in the standard factory position, well chocked side-to-side, and for-and-aft so the spar can’t move at the deck.
2. Position the aft side of the mast step at 8 ¼” from the bulkhead. This position will get you close to the correct prebend. Due to inconsistencies in bulkhead positions, you may need to move the position slightly forward or aft of this position.
Check to see if the 8 ¼” position is giving you the correct prebend.
1. Attach the main halyard to the gooseneck as close to the back of the spar as possible and tension the halyard hard.
2. Hoist someone up the mast just above the bottom spreader.
3. While someone standing on deck pushes the main halyard against the back of the mast at the goose neck, have the person up the mast measure the maximum distance from the back of the spar to the closest part or forward edge of the main halyard. Again, the maximum distance or prebend should be a couple of feet above the bottom spreader. Have the person up the mast move the tape measure up and down in that area to determine max prebend.
4. This prebend measurement should be very close to 2 ¼”. If your prebend is less, then move your mast back to increase prebend. If your prebend is more, move your mast butt forward to reduce prebend.
5. Once your mast butt is in the correct position, scribe a permanent line on the beam that the butt sits on so you will never have to go through this process again.Pre-bend is very critical in allowing your mainsail to react correctly with back stay adjustments and
ensures the correct slot between the luff of the mainsail and the leech of the jib.
TAKE THE TIME TO ADJUST YOUR MAST BUTT FOR THE REQUIRED 2 ¼” PREBEND FOR MAXIMUM PERFORMANCE WITH YOUR ULLMAN SAILS!
Centering the Spar
1. Measure back from the stem fitting on the mast 9′ 7″ to each rail. Mark with a permanent marker.
2. Attach a tape measure to the jib halyard and raise a couple of feet.
3. Measure to each side and adjust the upper shrouds so the measurement is the same on both sides.
Shroud Tensions
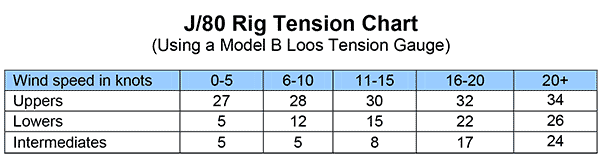
1. Once the mast is centered, tighten the uppers so that they read (30) on your Loos tension gauge.
2. Tighten the intermediates so they read (8) on the Loos gauge.
3. Sight the rig by looking up the mast track and adjust the intermediates in ¼” increments so the rig is straight. If you tighten one side a ¼ turn, ease the other side a ¼ turn to insure you keep the same approximate tension on each intermediate.
4. Tighten the lowers to (15) on the Loos gauge.
5. Again, repeat step 3 until the spar is straight side-to-side.
NOTE: If you find that it requires much more tension on the lowers or intermediates on one side than the other to keep the spar in column, the mast may need to be re-chalked from side-to-side at the deck. If not corrected, you will be sailing with different headstay sag from tack to tack, which will make it impossible to duplicate jib lead position and jib sheet tensions from tack to tack.
PLEASE CALL US IF YOU THINK YOU HAVE THIS PROBLEM AND WE CAN TALK YOU THROUGH
RE-CHALKING THE MAST AT THE DECK!
Your rig is now tuned for our base setting at 10-15 knots.
J/80 Rig Tension Chart
The thread size of your turnbuckles will determine the amount of turns it will take to get from one setting
to another. We recommend making a chart with the amount of turns so that you can change settings
easily and accurately on the water between races.
Good sailing,